So you’re thinking about giving your space a modern twist? That’s a brilliant idea! One way to achieve this is by installing a horizontal baluster—an underutilized jewel in the world of interior design. This blog will guide you on how to select, install, and maintain your horizontal baluster.
1. Select and Purchase Your Horizontal Baluster
First things first, you need to select the right horizontal baluster for your home. But you might be wondering, how do you go about making the right choice?
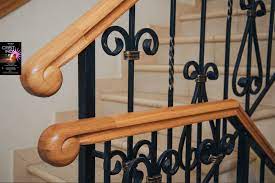
Consider the Material: Horizontal balusters come in a variety of materials—wood, metal, composite, and even glass! Wood offers a classic look and is usually less expensive. Metal and composite balusters are more durable and require less maintenance. Glass balusters, while more expensive, provide a sleek, modern look.
Size it Up: The size of your baluster should align with the overall design of your space. A larger baluster might give your home a bold statement, but smaller ones can provide a more delicate, intricate look.
Color Matters: The color of your horizontal baluster can greatly affect your room’s aesthetic. Darker colors like black or bronze can create a striking contrast, especially in lighter rooms. Lighter shades, on the other hand, might blend well with your existing décor.
Price Point: Your budget can determine the type of horizontal baluster you can afford. Higher-end materials such as glass and stainless steel are often more expensive compared to wood or composite.
Where to Buy: Your local home improvement store is a good starting point. However, don’t overlook online retailers—they often have a wider selection of horizontal balusters.
Once you’ve made your decision, it’s time to purchase your chosen horizontal baluster. Remember, the goal is to find a baluster that not only suits your taste but also enhances the overall look of your home. So take your time, do your research, and you’ll be on your way to a more modern looking space in no time.
Now, stay tuned for the next part of this guide—the step-by-step installation process. You’re about to turn your modern home dream into a reality!
2. Step-by-step Installation Process
You’ve selected your ideal horizontal baluster and made your purchase—congratulations! Now, it’s time to roll up your sleeves and get down to the installation process. Don’t worry, we’ve got you covered!
Get Your Tools Ready: You’ll need a few basic tools for this job. These include a drill, screws, a level, and a tape measure. It’s always a good idea to have everything within reach before you start.
Measure Twice, Cut Once: Start by measuring the distance between your railing posts. You want to make sure your horizontal baluster fits perfectly. This step is crucial; remember the old carpentry saying, “Measure twice, cut once.”
Drill Holes for Balusters: Based on your measurements, mark where the balusters will go on the railings. Then, drill holes for the balusters. Make sure the holes are straight and level, otherwise your horizontal baluster might end up looking crooked.
Install the Balusters: Now comes the fun part! Insert your horizontal balusters into the drilled holes and secure them with screws. Use your level to ensure each baluster is straight.
Final Touches: After all the balusters are installed, give everything a good once-over. Make sure each baluster is secure and level.
The installation process might seem daunting, especially if it’s your first-time DIY project. But remember, patience and precision are key. Plus, nothing beats the satisfaction of stepping back and admiring your handiwork.
Next, we’ll dive into tips for maintaining your horizontal baluster for a modern look. Keep reading, because this is where the magic really happens!
3. Tips for Maintaining Your Horizontal Baluster for a Modern Look
So, you’ve successfully installed your horizontal baluster. However, the job’s not done just yet. Maintaining the stylish, modern look requires a touch of effort. Here are some tips to keep your baluster looking fresh and trendy.
Regular Cleaning: To maintain the shine and lustre of your baluster, make it a routine to clean it regularly. A simple wipe down with a damp cloth can do wonders. If your baluster is made of metal, you might consider using a metal polish for extra sparkle.
Check for Loose Fittings: Over time, the screws holding your balusters may become loose. Regularly check the tightness of the screws and tighten them if needed. This will ensure the baluster stays sturdy and safe.
Repaint or Refinish: If your horizontal baluster is wooden, it might need a fresh coat of paint or a new finish from time to time. This can breathe new life into your baluster, giving it a modern look. Choose a color that complements your home’s aesthetic.
Look Out for Damage: Keep an eye out for any damage to your baluster. Whether it’s a crack, chip, or rust, early detection can save you a lot of time and money in the long run.
Hire a Professional: If you’re unsure about any aspect of maintaining your horizontal baluster, don’t hesitate to call a professional. They’ll have the expertise and tools to keep your baluster looking its best.
Remember, your horizontal baluster is not just a safety feature—it’s also an important part of your home’s aesthetic. By taking care of it, you’re ensuring it continues to add beauty and value to your home. Enjoy the modern look of your horizontal baluster, and don’t forget to flaunt it to your neighbors!
Author
Related Posts